
Weavers love to make scarves, am I right? They can be as complicated or as unfussy as we like, are a great way to try out new yarns, and make nice gifts for ladies or gents. I’m sharing my new pattern design here for my Snappy Winter Wool Scarf:
Materials…
I used Harrisville Designs “Shetland” weaving yarn for this project in charcoal and navy. The yarn has a tweedy look. If you’re substituting another yarn, try to find one that has approximately 10 wraps per inch. You’ll need two colors.
Tools…
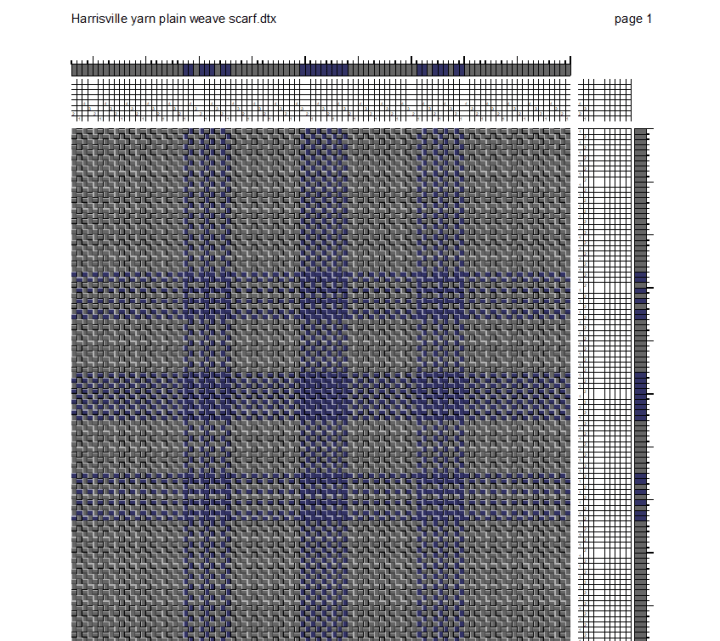
4 shaft loom, 10 dent reed, two shuttles, tapestry needle, rotary cutter. Note: you could use a 2 shaft loom, too, or a rigid heddle loom. If you do weave on a two shaft or rigid heddle loom, simply adjust the threading from 1-2-3-4 as shown in the drawdown to 1-2-1-2, etc… across the width of the warp.
The numbers…
For two scarves, wind a warp of 5.5 yards, 73 ends charcoal (or your main color, MC) and 21 ends navy (or your contrasting color, CC). Sley the ends in a 10 dent reed, 1 end per dent following the chart below:
Weaving…
After beaming and fine-tuning the tension on your warp, weave a header of about 2-3″ using scrap yarn. Allowing for about 3″ of space (for fringe) between your header and the beginning of your first scarf, start weaving with MC. Leave a 36″ tail for hemstitching. I hemstitched over 3 warp ends and up 2 tabby picks. Aim for about 10 picks per inch. Weave MC for 6″. Weave the color and weave border using both CC and MC (this will be about 5″), weave the center panel for 50″, repeat the color and weave border, and balance out your scarf with another 6″ of MC weaving. Hemstitch. If you’re weaving another scarf, allow for at least 5″ between each piece to account for fringe on both ends. Note: relax the warp on the loom between weaving breaks if you’re weaving with wool.
Finishing…
Wash your scarves in warm water with gentle detergent. Don’t agitate too much or (assuming that you’re using wool) your scarves will felt and then what will you do?!? Rinse carefully, using the same temperature of water for rinsing as you did for washing. Roll scarves in a towel to remove excess moisture. Hang to dry. Press on “wool” setting. Trim fringe to a tidy 1.5″ using a rotary cutter. My scarves ended up having finished dimensions of 8″ x 64″. If you want longer scarves, you will probably have enough warp to squeeze out a slightly bigger wearable.
You’re done!
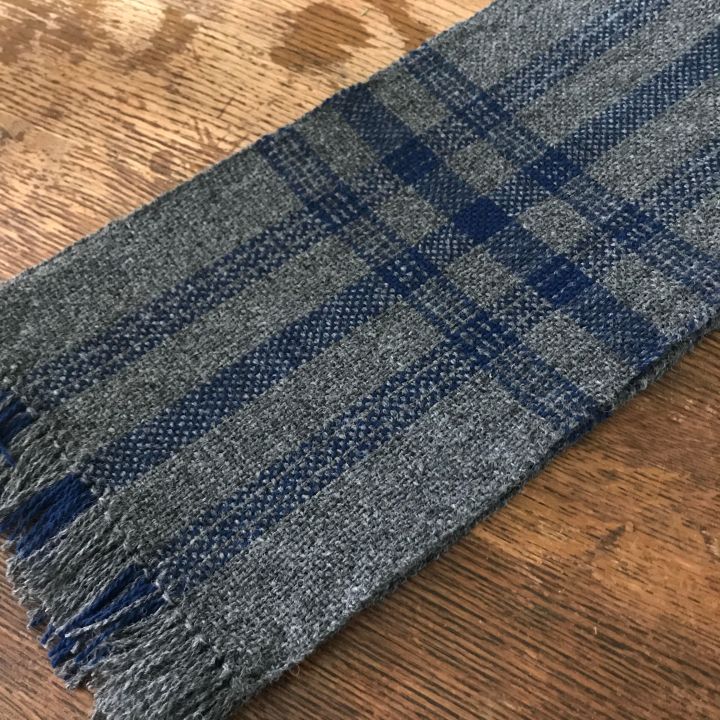
Admire your Snappy Winter Wool Scarf. I enjoyed how much the “Shetland” yarn softened and bloomed after washing and pressing!
Google (Drive) it…and a PSA.
If you’d like to have a printed copy of the pattern draft, please click here for my sharable Google Drive file or copy/paste this link into your browser:
https://drive.google.com/file/d/15tMc1zw_2W6vuz2gvbWibkHEmuMgITV_/view?usp=sharing
Please feel free to share your comments here. And in the spirit of sharing, please refrain from profiting from the sale of this design. Intended for home use only. Many thanks.
Happy weaving,
kate k.

This is so pretty! Love the colors.
LikeLike
Thank you! The charcoal is a favorite.
LikeLike
Sorry, I meant to say yardage. Thanks again.
LikeLike
For two scarves I came up with these numbers:
Warp (includes 28” loom waste)
Main color = 402 yards
Contrasting color = 116 yards
Weft for two scarves:
Main color = 340 yards
Contrasting color = 22 yards
Total main color = 742 yards
Total contrasting color = 138 yards
A single cone of HD Shetland has 900 yards. A cone of each color should be sufficient for the project. If you want to have longer fringe on the ends, you’ll need to add length to the warp.
LikeLike
Thank you. That is very helpful. I really love the pattern
LikeLike
You’re welcome and thank you! I made the pair for my son and nephew back several years ago. 🙂
LikeLike
I’m making the scarf for a coworker. This way I get the practice and they get a scarf.
LikeLike